Home › Forums › Terrain and Scenery › Tiny Tree Tutorial
- This topic has 5 replies, 6 voices, and was last updated 6 years, 9 months ago by
 Volunteer.
-
AuthorPosts
-
15/06/2017 at 18:12 #64869
 Autodidact-O-SaurusParticipant
I’m ever so slowly working up to gaming the American Civil War with 10mm figures. Since this is a new size for me (and most likely it will involve a lot of solo gaming), I’m also creating all new terrain. For me, part of the charm of miniatures gaming is its relative low cost. I don’t invest large sums in my hobbies. (In fact, I have been described as pinching pennies so tightly that Mr. Lincoln squeals! But that’s a whole different story.) Furthermore, I like modeling projects. I enjoy the challenge of creating good looking games for minimal expense. What follows is a short tutorial (with bad cell phone photos) on creating decent looking individual trees for 10mm games for just pennies apiece.
Glue a 1 ¼ wire nail to a penny using your glue of choice. I use Gorilla Glue CA to adhere the nail to the penny but then use Aleene’s Tacky glue to strengthen the bond. Paint the penny with earth tones. You may wish to add your typically basing techniques to the tree base at this time. Paint the nail tree-trunk color (I use a dark gray)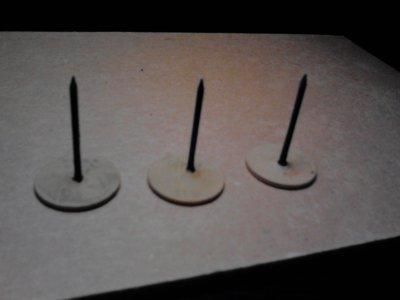
Acquire a kitchen sponge, preferably unused. Tear it into chunks roughly ½ to ¾ inch in size. Skewer the sponge chunks onto the upright nails. Sometimes a single chunk is adequate, other times you may wish to add several smaller or elongated pieces. Try to arrange the sponge pieces in irregular angles. While it may be acceptable to have a flat bottom to the tree foilege, you’ want to avoid having obvious flat surfaces.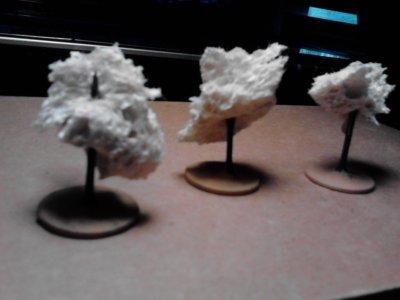
Next, paint the spongy parts black or dark brown. This is kind of a tricky step. I use watered down black artist’s gesso for this. Gesso is very densely pigmented but rather thick. I mix the gesso with water in a bottle cap and then dab it onto the sponges using a very wet, stiff brush. You want it really wet so it soaks into the sponge coloring all those hard to reach areas. But, since the sponges are quite moist by the time you’ve finished you’ll want to let them dry for 24 hours before the next step. (I’ve considered putting the sponge parts into a zip lock bag with some mixed up Ritz fabric dye. I’ve yet to try this, though. If it works, it would save a fair amount of labor.)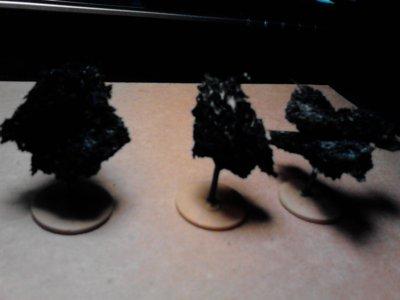
Finally, apply watered down white glue to the sponges in the same manner that you applied the gesso. Then quickly swirl the gluey tree into a container of flock. Vigorously tap the base of the tree to dislodge any loose flocking and ‘viola!’ you’ve completed a mini-tree. One hundred and twenty of these and I think I’ve spent around US $2.50. That’s a bargain at twice the price.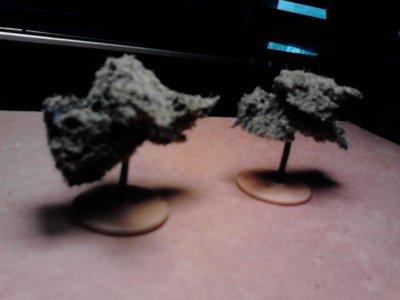
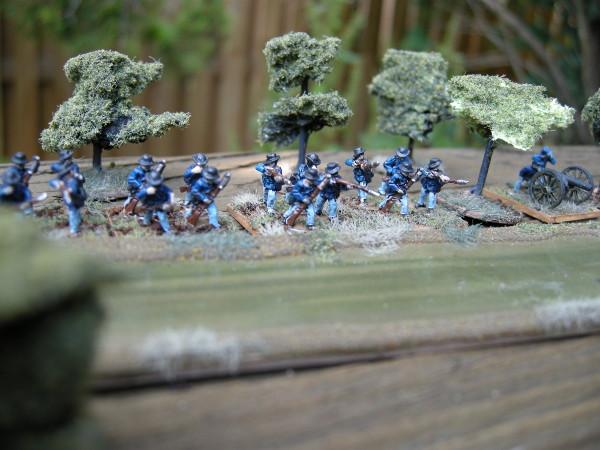
Finally, an action shot!
Self taught, persistently behind the times, never up to date. AKA ~ jeff
More verbosity: http://petiteguerre.blogspot.com/15/06/2017 at 18:41 #64870 MikeKeymaster
Hey, they turned out pretty neat.
 16/06/2017 at 02:09 #64905
 Don GlewweParticipant
Next, paint the spongy parts black or dark brown. This is kind of a tricky step. I use watered down black artist’s gesso for this. Gesso is very densely pigmented but rather thick. I mix the gesso with water in a bottle cap and then dab it onto the sponges using a very wet, stiff brush. You want it really wet so it soaks into the sponge coloring all those hard to reach areas. But, since the sponges are quite moist by the time you’ve finished you’ll want to let them dry for 24 hours before the next step. (I’ve considered putting the sponge parts into a zip lock bag with some mixed up Ritz fabric dye.
Aleternate (and cheaper!). Stick the sponge pieces into a bag and pour in some latex paint (cheap, hardwarestore ‘goofs’ are good). Squish, squeeze.
Pull out the pieces, give them another squeeze, and stuff them on the trunks. While still wet, do the flock stuff – multiple colors are encouraged for a diverse tabletop appearance. Seal if desired.
Once dried, paint trunks.
16/06/2017 at 06:39 #64909Whirlwind
ParticipantYes, they look pretty good.
16/06/2017 at 07:37 #64911Alexander Wasberg
ParticipantA good way to make lots of trees on the cheap, thanks for posting this.
http://lasersandbroadswords.blogspot.com My project blog
06/07/2017 at 15:27 #66629 VolunteerParticipant
Yes indeed, very nice!
"Research is what I’m doing when I don’t know what I’m doing"
Wernher von Braun -
AuthorPosts
- You must be logged in to reply to this topic.