
- This topic has 2 replies, 2 voices, and was last updated 7 years, 3 months ago by
 Jemima Fawr.
-
AuthorPosts
-
26/12/2016 at 18:34 #54550
Irish Marine
ParticipantHi, does anyone here play Cold War using the modified rules for Battlefront WW2 by Fire & Fury.
05/01/2017 at 21:09 #55081 Jemima FawrParticipant
Hi Irish,
My sincere apologies for my prolonged absence from this project. ‘Real Life’ got firmly in the way for the last few months. 🙁
I’ve finally had my first game of ‘Battlefront: Modern’ (not including 1980s Angola, which we did previously) and had an absolute blast! It’s been a long time coming…
We pitted some West German Panzergrenadiers (M48A2GA2 and Marder 1A1 plus attachments) against the best part of a Soviet Motor Rifle Regiment (BMP-1 and T-64A/B plus attachments) in Schleswig-Holstein, circa 1984. The Germans managed to give the Soviets a bloody nose and disengage relatively intact before the Soviets managed to bring the full weight of their artillery to bear.
Highlight of the game for the West Germans was a rather rash charge by T-64s into woods that happened to contain a previously-unlocated company of dug-in panzergrenadiers. The panzergrenadiers managed to destroy two T-64s in close combat and another with MILAN before being driven back with light losses. However, one of the T-64s got bogged down during its pursuit and was then charged by rallied panzergrenadiers, who forced the crew to surrender. 🙂
Highlight for the Soviets was a deadeye SA-9 crew, who singlehandedly managed to down or drive off half a squadron of RAF Jaguars. 🙂
Anyway, I’ve amended the Soviet and West German infantry cards much as per your recommendations. The main changes are:
- The Soviet infantry firepower ratings were too high at longer range bands and have been reduced to give the West Germans the edge in the longer-range engagement. I didn’t agree that the West Germans were underrated; rather that the Soviets were overrated, though I’m open to persuasion. 🙂 The West German panzergrenadier firepower stats are the standard stats for an infantry section equipped with SLRs and a belt-fed GPMG and are the same as the British (and many others). Unfortunately there isn’t much ‘wiggle-room’ in the numbers.
- West German PzF 44, Armbrust and Carl Gustav stats have been corrected.
- RPG-7V stats on the Early Motor Rifles card (and some others) has been slightly downgraded. I’ll need to add RPG-18 as an option on these cards.
- The Late Motor Rifles card has had the RPG-7V changed to RPG-7VL with improved stats at close range.
- Flank armour stats improved on M48 and M60 series.
Some previous points of discussion:
- One of your previous questions was re the inconsistency of 20mm factors for the West Germans – the reason is the weapon itself. The Rh-202 20mm cannon fitted to the Marder, Luchs, Wiesel, NM-135, KraKa, FK-20 AA gun and FK-20-2 twin AA gun is a truly superb weapon and therefore gets slightly better ratings than the HS.820 20mm cannon fitted to the SPz Kurz and SPz Lang series, which get the ‘standard’ 20mm cannon ratings. However, I may well be doing the HS.820 a disservice, so will look into it a bit deeper.
- Re the Marder and MILAN: The reason the MILAN isn’t on the card is that it primarily belongs to the dismounts rather than to the vehicle itself. The card does give the Marder the ability to fire MILAN when the weapon is mounted as passengers. For example; in the case of the BMP, the ATGM primarily belongs to the vehicle itself and isn’t dismounted, so the missile stats are on the BMP card. I do the same thing with Land Rovers and recoilless rifles/ATGMs, as it saves having to do a different card for every single variation of heavy weapon mounted on a Land Rover. However, it’s no great drama if people prefer the MILAN stats to be on the Marder card and change the note to ‘MILAN may be dismounted’ or similar. That reminds me: I need to add the same MILAN capability to the M113G card.
Some other thoughts and developments:
- The latest version of the West German TO&Es is almost ready. Not too many changes to worry you, but I’m looking at the incorporation of MILAN into infantry units. It’s difficult to justify the incorporation of MILAN into the tiny Marder panzergrenadier squad which had only 7 dismounts, reduced during the period to 6, so once you detail 2 or 3 men to man the MILAN and carry its ammo, that only leaves you with 3 or 4 men to man the MG3, PzF44 and lead the squad! Consequently, I think that’s probably best left as it is – simply replace panzergrenadier squads with MILAN teams if they decide to dismount the MILAN from the Marder. However, the much larger Jaeger and M113G-mounted panzergrenadier squad organisation could easily absorb the MILAN, so I’ll add MILAN as an integral weapon to those cards and remove the separate MILAN teams as an option from those companies.
- I’ll have to remove the Armbrust stats from a few cards in order to fit MILAN in as an integral weapon, though Armbrust was only there as a ‘what-if’ in any case, as it was never formally adopted by the Bundeswehr.
- In a previous iteration of the cards we had the T-72, T-64 and T-80 as ‘Medium’ sized vehicles due to their low profile. After much discussion we changed them again to ‘Large’ vehicles. However, in retrospect I think I prefer them as Medium. We played them as Medium in our recent game and it worked perfectly well. They do get a penalty in that they’re more difficult to get Hull-Down, so the smaller size is the payoff. What do you think?
- I’ve removed the close combat bonus for having troops mounted in MICVs such as the BMP, as this was generally a flawed and failed concept. The rare exceptions being some unusual ‘gun-buses’ such as the South African Casspir.
- Re laser-guided bombs: I was thinking about them being somewhat similar to artillery called in by FACs or helicopters with a laser-designation capability. Small IDF template, though high damage. The aircraft will not actually appear over the table, though may be engaged by some longer-ranged SAMs (e.g. those with 100+ range?).
Please do keep your suggestions coming, as you are undoubtedly the most experienced player of the rules! 🙂
My wargames blog: http://www.jemimafawr.co.uk/
06/01/2017 at 15:20 #55115Jemima FawrParticipantSome photos of our game. Please excuse the very basic terrain – the friend I normally game with has fantastic terrain, but he was absent, so this is my rubbish ‘green parachute silk and bits of carpet’ terrain:
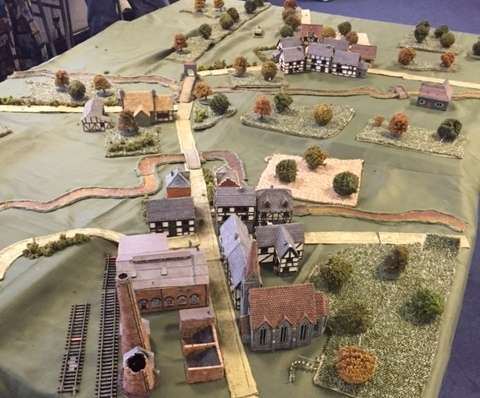
The battlefield: Elements of the Soviet 94th Guards Motor Rifles Division are entering from the far table edge, with the objective of bypassing and containing NATO resistance, breaking through and driving for Hamburg.
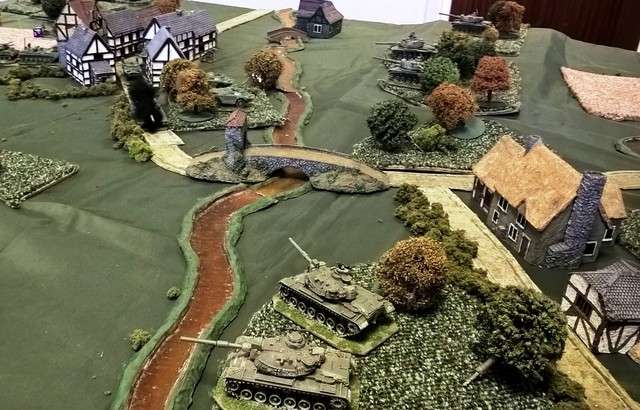
Waiting for the Soviets are the men of the 161st Panzergrenadier Battalion (Mixed), part of the 16th Panzergrenadier Brigade, 6th Panzergrenadier Division. They are part of the Danish-German-US-British LANDJUT Command blocking the way to Hamburg and the Danish border. Sadly the division is one of the last regular Bundeswehr formations fielding the M48A2GA2 medium tank. Nevertheless, these old beasts of war successfully ambush and destroy the Soviet recce element’s T-64B platoon as it noses its way out of town. The rest of the Soviet recce dive off the road and luckily manage to spot the rest of the German panzer company, though don’t spot the dug-in Panzergrenadiers lurking along the wooded ridge.
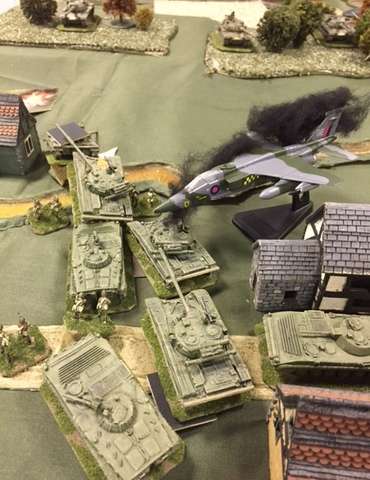
Hoping to lure the Soviets into an ambush, some of the panzers fire a few ineffectual shots and withdraw, covered by a section of Jaguar 1 tank destroyers, lobbing long-range HOT missiles into the mass of Soviet armour . In the meantime, there are some remarkably ineffectual calls for fire by attached FOOs on both sides! The German FAC has better luck however, and manages to call down a strike by Jaguar GR1s from 54 Squadron RAF (part of the UK Mobile Force reinforcement to Denmark). However, the Soviet regimental air defence troops aren’t napping and an SA-9 section manages to luckily splash the first RAF Jaguar! A second Jaguar strike fares a little better and survives its run, though is ‘Disordered’ by the SA-9 and only manages to suppress a few AFVs before limping back to base.
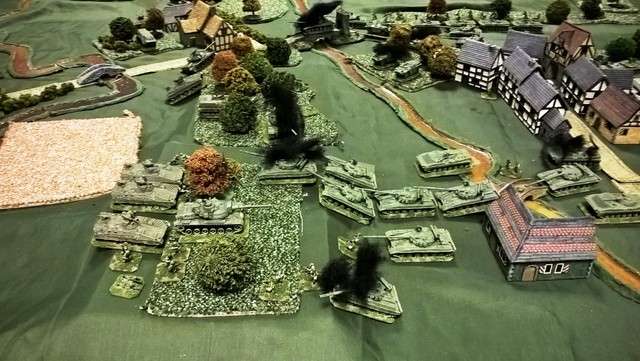
As the Soviet commander wonders how he’s going to get his bridgelayer through the arch, following tanks decide to avoid the traffic jam in town and hook right, past the burning recce T-64 platoon.
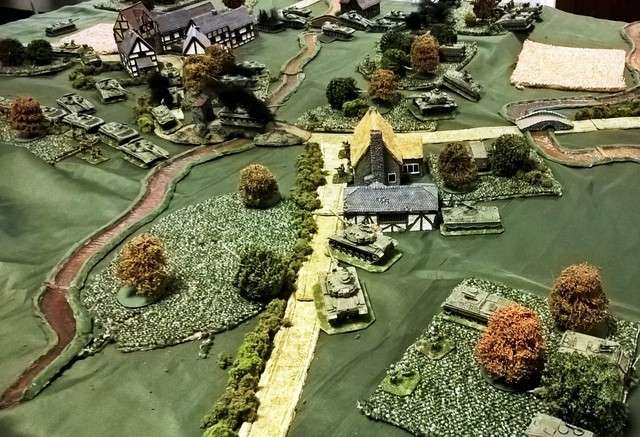
The lurking M48s managed to knock out the lead T-64 platoon as it attempts to cross the bridge; much to the annoyance of some German recce troops, who were lurking nearby with Panzerfaust 44s ready to deal with the first Russkis to cross the bridge. A BRDM-2 scout car is also knocked out as it attempts to recce the river valley. In the distance, the Soviet tanks, rashly pursuing the withdrawing panzers, have run straight into an ambush, courtesy of the dug-in 3rd Panzergrenadier Company.
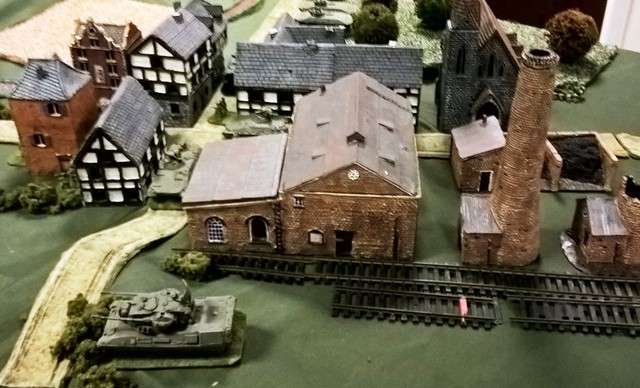
At the rear of the German position, the 2nd Panzergrenadier company is dug into urban terrain, while air defence elements lurk nearby, ready to deal with any Soviet air threat.
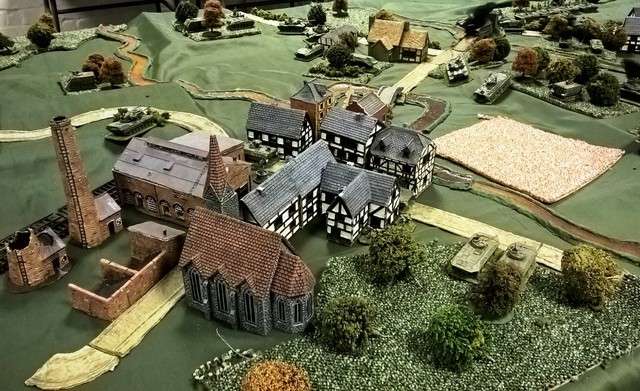
Another view from the rear of the German position.
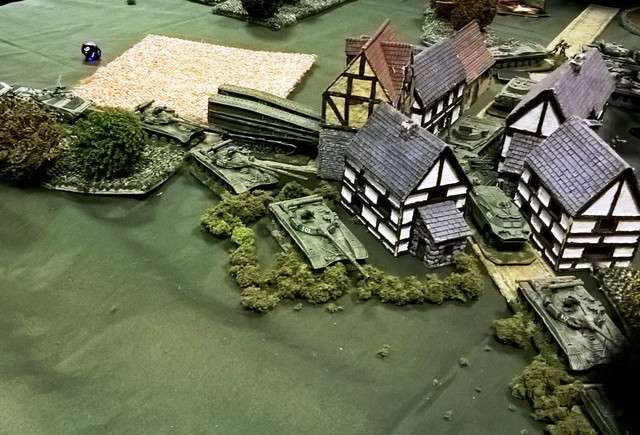
Here we see the situation on the German right in the aftermath of the ambush; One T-64 was destroyed outright by panzergrenadiers as it attempted to overrun the position, while another was destroyed by a flank-shot from a MILAN team. A third T-64 got bogged down as it overran the position, was counter-attacked by panzergrenadiers and surrendered! However, the panzergrenadiers were mainly driven back, though with only light losses and were soon able to rally. Not so lucky was the MILAN team, which pushed its luck and was soon overrun by vengeful Soviet recce dismounts. Nevertheless, fire from the remaining M48 within the wood managed to suppress the surviving T-64s and a bot of bad luck saw them scurrying back toward the safety of their comrades. This gave the Panzergrenadiers the time they needed to jump into their Marders and drive like hell for their fallback position at the factory. However, in the meantime they lost a further panzergrenadier section and the panzer company commander, who bravely attempted to launch a single-handed counter-attack on the flank of the Soviet tank company.
My wargames blog: http://www.jemimafawr.co.uk/
-
AuthorPosts
- You must be logged in to reply to this topic.
